Project 4 - FMP: Bali Temple
Name: Mark Eastland
P Number: P13213323
Email: Mark_Eastland@hotmail.co.uk / P13213323@myemail.dmu.ac.uk
Project Title: FMP: Bali Temple
Project Duration: 20 Weeks
Overview/Brief Description: This is a fully playable demo of a realistic mixed with fantasy environment we've named 'Garuda's Temple'.
Narrative/Story: Rangda, demon queen of black magic and creator of disease, has long been imprisoned by the efforts of Vishnu: the preserver and guardian of mankind. Within his loyal subject’s stomach, swallowed and contained by Garuda, the fiend now rests. Yet time has passed, memories in the minds of civilisation have faded and the temple has fallen into desuetude. The seal upon Rangda is weakening.
Area Key: I mention specific areas of the level and this shows you what parts I'm talking about:

General Breakdown
Mark - Environment
Mark's Assets:
Static Meshes + LODs:
-Please see the FBX folder on K-Drive. - Roughly 220 mesh fbx files + 33 LODs
Assets I helped Andy with:
-Made the base meshes for Andy to sculpt on for the stair trim pieces - week #6

-Eagle statue body = Helped by doing a quick retopo - week #6 - Andy later retopologised it completely

-Tree mesh = Helped with some retopology at base of tree + made the branch alphas - branches made in week #13

- Andy and I figured out how to make the tree roots together in Speed Tree
Mark's Level Work:
Level Building/Set-dressing:
Level Design Ideas (Player pathway) = 25% (25% Andy, 25% Denise, 25% Dom)
Initial Block-outs = 50%
Landscapes = 60% (Placing/sculpting/painting - Andy made the textures for them)
Vista = 65%
Start Area = 55%
Courtyard = 55%
Cave Tunnel = 75%
Inner Cave = 80%
Blocking Volumes = 60% (Dom 20%; Andy 20%, play tested the level & found flaws so I fixed them)
Lighting:
60% of all lighting in the level = Placed and tweaked most lights, received advice from the team on what they wanted.
Shaders:
-85% of the standard material + instances set-ups + constant material tweaks, with the following parameters: Colour Overlay, Albedo brightness+contrast, Roughness brightness+contrast, Specular, Saturation, Opacity, Emissive strength etc. Some of these were set up for almost every material made.
-Waterfall Shader (Dom added a 'fullness' option to it)
-Selective Decal material.
-Foliage material set-ups.
-Light ray cone
Particles:
The ones highlighted in BLUE were made by me (Modified the starter content P_Steam_Lit for cliff waterfalls):

Post-Process:
80%
-Made & edited them all with team input on the vista shot as we all pitched in as to what looked best.
Overall optimisation + for the Oculus:
70%
-Cleaned up unnecessarily placed assets
-Downsized all textures appropriately
-Minimised objects casting shadows
-Minimised shadow casting & Dynamic lights
-Optimised light-maps for all the assets
-Made mesh LODs and used GPU particles with bounding boxes
-Sought out for anything causing issues
-Mesh culling at a distance
Sounds:
-Recorded sounds with Dom (Unfortunately didn't get to use) + Searched online
-Made a composite ambient sound for cave and lighting the torch
-Partly made the wood footstep sound with Dom
-Placed/Tweaked 70% of them
UI (Images only):
-Destination Arrow
-Compass template for Dom to use which Denise designed later
-'Key Press' template; Dom changed the text for each key needed
Other:
-Organisation: consistently kept track of everything going on, wrote to-do lists & priority lists for Andy, Dom and I + called meetings when things got muddled and needed clarifying.
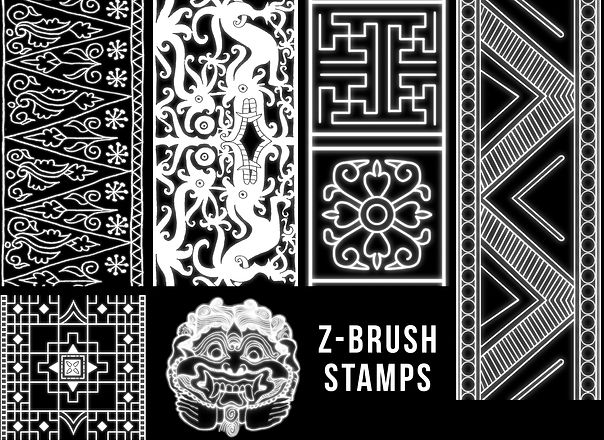
-Scanned in the books Andy got from the library and made a few stamps from the cultural designs to be used in Z-brush & decals.
-Made block-out meshes for everything Dom needed to use in the mean time to get the level working, which we later replaced.
-Made the initial, correctly proportioned block-out meshes for us to use whilst we blocked in our ideas early on during weeks 1-3.
----------------------------------------------------------------------------------------------------------------------
Andy - Environment (Andy's Blog)
Andy's Assets:
Static Meshes + LODs:
-Please see the FBX folder on K-Drive.
Assets Andy helped Mark with:
-Modelled the feather stair curl initial base mesh

-Showed Mark a good technique for adding grunge to assets in Quixel
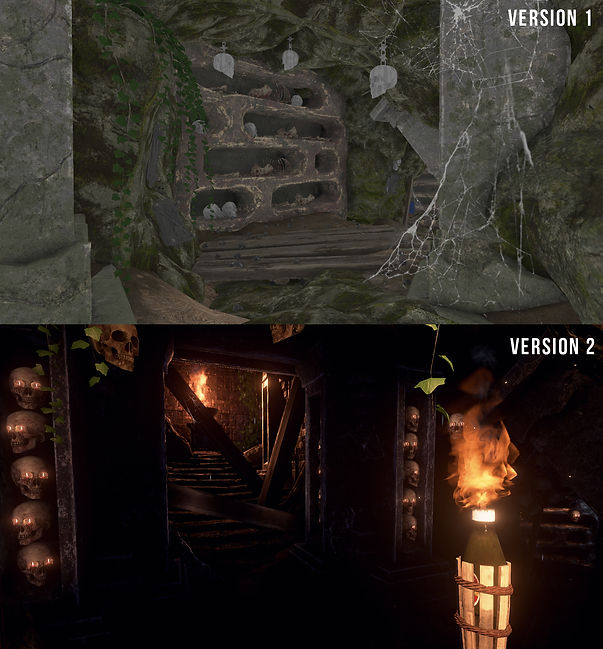
-Advised and showed me how to texture the tongue better (Initially was supposed to be flesh breaking through rock but was changed)

Version 1
Version 2
Andy's Level Work:
Level Building/Set-dressing:
Level Design Ideas (Player pathway) = 30% (30% Andy, 20% Denise, 20% Dom)
Initial Block-outs = 50%
Landscapes = 40% (Textures)
Vista = 35%
Start Area = 45%
Courtyard = 45%
Cave Tunnel = 25%
Inner Cave = 20%
Lighting:
10% of all lighting in the level
Shaders:
-Standard material set-ups for some of own assets created.
Overall optimisation + for the Oculus:
-Made LODs for bricks and bushes + LOD lightmaps for these meshes
Sounds:
-Found the growl at the end of the level & offered crit when it came to Mark and Dom's sounds.
Research:
-Gathered 1st hand research from Temples in Indonesia through family members (Please see Andy's blog/K-drive for images).
-Got a number of books from the library for us to look at and find some cultural designs which we can include in our assets.
-Looked at Darksouls, Tomb Raider & Uncharted for how they've constructed their assets/set-dressing (helped a huge bunch at the end of the project)
Other:
-Gave Mark a demo on using Bitmap2Material 3 to make a tiling texture.
-Showed Mark how to get started in Quixel.
----------------------------------------------------------------------------------------------------------------------
Dom - Technical Work (Dom's Blog)
Dom's Assets:
Static Meshes:
-LotusFlower_001
Dom's Level Work:
Level Design Ideas (Player pathway) = 30% (30% Andy, 20% Denise, 20% Dom)
Lighting:
10% Of all lighting in the level
Shaders:
-All Material Functions (See the "Material Functions" folder in engine)
-Base Water Shader on which instances were built from
-Landscape Atlas
-Light ray planes
-Added a "fullness" option to Mark's waterfall shader
Particles:
The ones highlighted in GREEN were made by Dom:

Overall optimisation + for the Oculus:
-30%
-Found a good way of testing texture re-sizing very quickly and easily finding what textures use the most memory at the end of the project (Very useful tip)
-Turned off the directional light & the skylight when you enter into the cave, gained a large amount of fps.
-Made a culling script used on the waterfall + particles.
-Made 3D widgets & prompts to work with the Oculus as the HUD does not.
Sounds:
-Made all the footstep sounds (made the wood one with Mark) + Made them work with the character's footsteps
-Recorded Sounds with Mark (Unfortunately didn't use)
-Searched online and found the footsteps, wind, waterfall & birds
-Placed/Tweaked 30% of them
UI:
-Made & placed all the 3D on-screen prompts which guide you through the level & Objective markers.
-All the Xbox/controller button images
-Final 'Key press' images
Blueprints/Widgets/Tools:
-All Blueprints/Widgets, including UI (See blueprints folder in engine, they are very complex) - Basically did everything that made it work as a game.
-Set up a server with source control in the engine & showed us how to use Perforce; it saved us a lot of time, and made it much easier to handle the engine file.
-Made an exporter for 3ds max. This enabled us to export a large clump of assets all named correctly in a couple of seconds.
Other:
-Set up a Trello page for us to add feature ideas to implement.
-Set up a timetable in excel at the start of the project with team input for timings.
-If anyone had a problem with a program, or the engine, Dom would be there to help if possible.
----------------------------------------------------------------------------------------------------------------------
Denise - Concepts/Art Direction (Denise's Blog)
-All concept Art + Sketches which helped us when modelling
-Book displaying the project work
-Final drawn UI Images (HUD & Compass)
-Narrative Story
-Level Design Ideas (Player pathway) = 30% (30% Andy, 20% Denise, 20% Dom)
Other:
-If we (environment artists) required help or additional info on the concepts, Denise would draw sketches and paint-overs to help us understand and get the point across even more.
-Denise helped with the final grey-block out of the courtyard area and blocked in a couple of the designs to aid Mark visualise the proportions.
-Advised us (environment artists) on creative ideas.
Important Side-Note:
These are generalisations; we all helped each other out with a lot of things, we consistently asked each other for feedback on what we were doing, and we have all learnt a lot from one another. This means not only from a technical standpoint with software, tips and tricks, how to do things right, but also a new way of thinking, working with consistent requests, and making iterations on your work. I am glad we all worked together and produced something using our individual strengths to make something we couldn't do alone.
Things such as background research on the culture, how current triple AAA games approach making certain assets, and other things which impacted our level may not be documented that much. As a team we did this throughout and bounced ideas off each other, all contributing to research and development of the project. Please look through my "weekly progression" images folder on the K-Drive to see how durastically things were improved over time. By doing this and consistently looking for ways in which we can improve what we have, we could keep learning new things and continuing to develop as artists.
----------------------------------------------------------------------------------------------------------------------
External Contributions (Sounds)
This Video Game uses these sounds from freesound (https://www.freesound.org):
(These are the ones I used, Dom should have a list of the ones he used too)
- Water Dripping in Cave, By Sclolex (https://www.freesound.org/people/Sclolex/sounds/177958/)
- Rocks, By adamgryu (https://www.freesound.org/people/adamgryu/sounds/336023/)
- Cthulhu, growl, By Cylon8472 (https://www.freesound.org/people/cylon8472/sounds/249686/)
- SpookyHorrorSound, By lennyboy https://www.freesound.org/people/lennyboy/sounds/275186/
-----------------
This Video Game uses these sounds from the Sonnis Sound Pack (http://www.sonniss.com/gameaudiogdc2016):
- Turbulent water flow (close perspective) 06, Sound Ex Machina - Water Flow
- The Spirits Awaken Again 5 & Heartbeat Getting Faster, Game Audio Monthly - #6, 2496sfx - TheHorror
- Bluezone-Dmovie-ambience-007 & Bluezone-Dmovie-ambience-022, Bluezone - Game Audio Monthly - #3, Dark Movies Ghostly Ambiences and Sound Effects
- BN_Intensity by Design_016 High Pitch Tone Osc Crunchy & BN_Intensity by Design_052 Tonal Brass Metal 2, BeautifulNoise - Intensity by Design
----------------------------------------------------------------------------------------------------------------------
Quick access to weekly Blog Posts:
Week 1 = http://goo.gl/ZPNwHw
Week 2 = http://goo.gl/01Nj1e
Week 3 = http://goo.gl/TwfgqB
Week 4 = http://goo.gl/mozb3b
Week 5 = http://goo.gl/NsOMQK
Week 6 = http://goo.gl/98xVcM
Week 7 = http://goo.gl/Z8cjZy
Week 8 = http://goo.gl/aVXUTj
Week 9 = http://goo.gl/2Z8YzJ
Week 10 = http://goo.gl/MGEWCH
Week 11 = http://goo.gl/Flcw62
Week 12 = http://goo.gl/IP5rZX
Week 13 = http://goo.gl/wcjSfv
Week 14 = http://goo.gl/xMMk9v
Week 15 = http://goo.gl/jNs0kl
Week 16 = http://goo.gl/T7GkFt
Week 17 = http://goo.gl/qQnyDe
Week 18 = http://goo.gl/WXjEgv
Week 19 = http://goo.gl/dnQVZ8
Week 20 = http://goo.gl/836eGL
Weekly progression of the level (Level shots posted at end of every weekly blog):
-Please see K-Drive for my folder titled "Weekly Level Progression" and simply flick through to see how it all progressed; there aren't any 'week 20' shots in there as those are our 'beauty shots' available down below.
----------------------------------------------------------------------------------------------------------------------
My Key Assets Breakdown (Not all assets included - some examples):
For the full list of ≈ 250 meshes, please see my K-drive FBX Folder.
If you wish to see who made a particular mesh:
- Open the K-Drive FBX folder and find the matching asset name in there with the one in the engine. To render out every single asset, organise and present it well would take weeks otherwise. The engine shows tri counts, UV layouts, material shaders, texture sheets and anything else you'll require to mark them on technicality. As requested by Stash: 3DS Max, Z-Brush, and Quixel projects are not on the K-Drive, also to save memory.
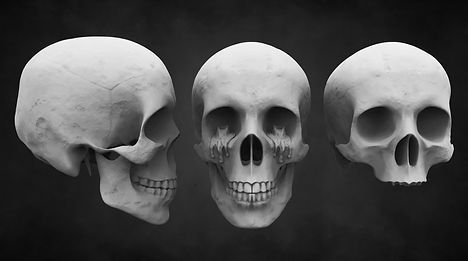
Sculpt Examples (Click to enlarge):


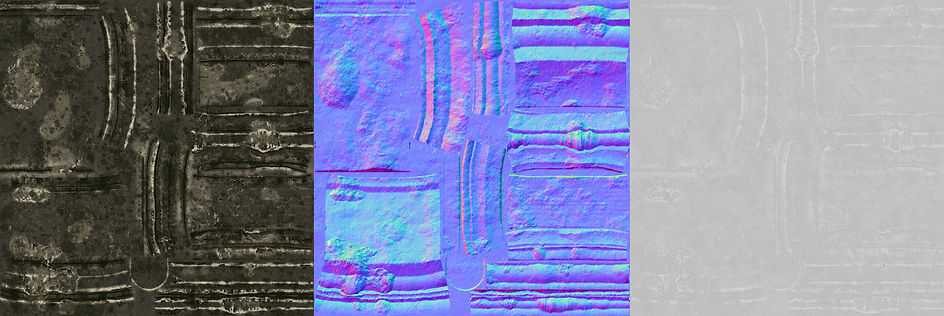
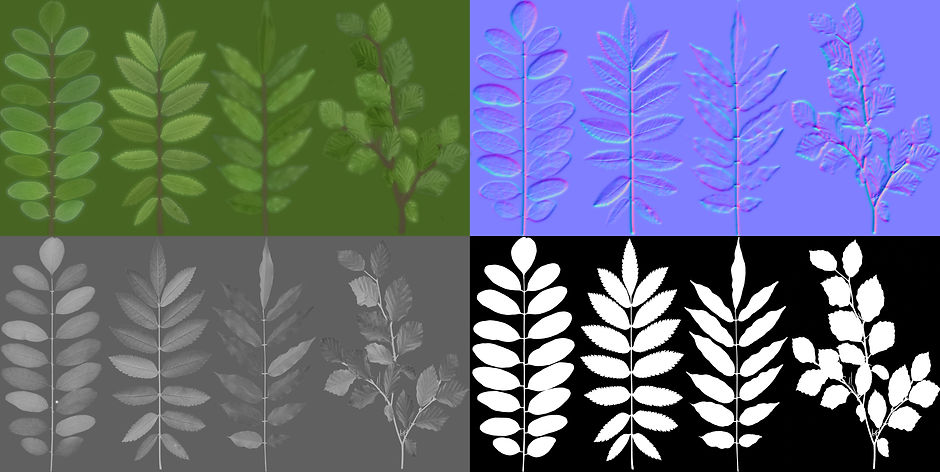
Texture Examples (Low-res):


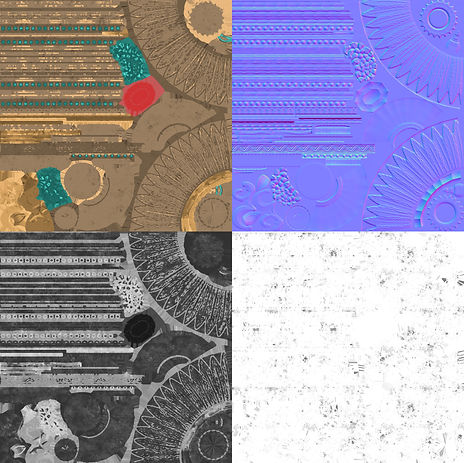


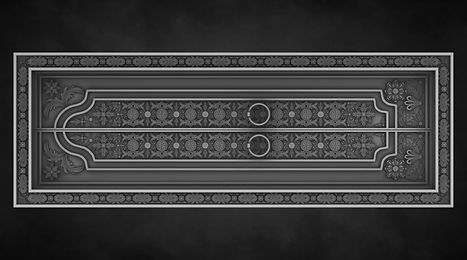
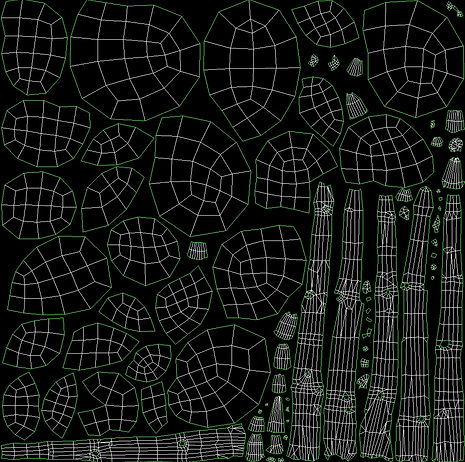
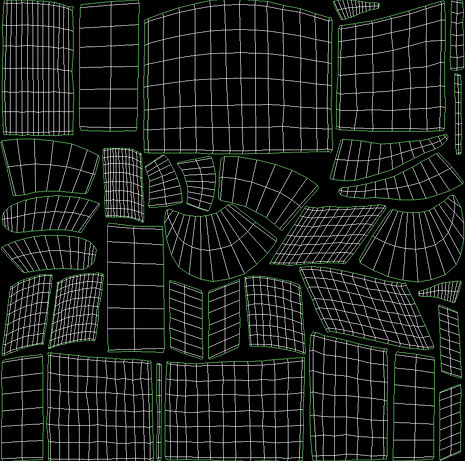
Unwrap Examples:


Renders/Engine Screenshots (Click to enlarge):


Other Assets which may need clarifying:
Andy's Foliage:
-Bush_001 & 002
-Small_Ground_Plant_001
-All of the flowers from 001-009
-Roots_001-003
-'Baby' Tree.
Mark's Foliage:
All other foliage that isn't listed above, e.g. Ivy Planes & 3D, Grass, Hanging Vines, 3D vine segment, Longleaf_001 & 002, Hosta 001-2 etc.
Mark Misc:
-Rice Paddies
-Rock_Small_001 - 010 & Twig_001 - 006
-Tier_Wall
-Tier_Podium
-Tier_Pillar
-Algae
-Spider webs 001-007
-RoundPillar_001
-Rainbow
-All billboards in the vista including the mountains (Images obtained from www.textures.com (CGTextures))
----------------------------------------------------------------------------------------------------------------------
Most Notable Points Of (3 Points each to keep it short):
What went well + Examples:
1- Communication between the concept artist (Denise) and the environment artists (Andy and I).
What I found was absolutely great and very exciting (especially at the beginning of the project), were the ideas that Denise was coming up with and how we could just get a great design to look at and just basically make our rendition of it in 3D. There were of course times when things didn't match up (The front door for example), or I didn't know how to make a certain part of the design, but we could always just ask Denise how she wanted things to be and we'd get a sketch to show it in more detail. The front door was a bit problematic for me structurally in 3D, but we spoke about how to simplify it due to time constraints and decided on what to do for the final design - it was good to have these creative, detailed designs to choose from.

2- Engine File management.
For half of the project we had source control set-up by Dom. Once taught how it worked, we were comfortable using it and a lot of time was saved which would have been spent faffing around with who has the engine file and copying things over. Perforce allowed us to simultaneously work on the engine and back multiple versions up whilst giving everyone access to it whenever they wanted it. You could still only have one person work on the level file itself at a time, but it meant Dom could integrate most of the blueprints he was working on without anyone even handing him the engine or making us stop work on the level.


3- Modelling & Texturing.
At the beginning of the project, I had almost no prior knowledge on how to use Z-brush, Quixel, 3D-Coat (only used in this project for retopology), or Bitmap2Material, all of which are extremely useful programs when it comes to getting a good result. When tackling a project such as this one, I knew there would be times when we would rely on our ability to use these well and that was scary. I'm glad we did this because even though my knowledge of Z-brush still isn't that good, I know it is at a stage where I can use it for general things and I am now much more interested to learn how to do more with it. The same applies to the other two programs. I could have used Susbstance painter for most of my assets, but I knew Quixel had a much better library and that both Andy and I would need to use similar processes in order to achieve that coherency throughout the level. Both of us learnt a lot as Denise's complex concepts pushed us to better our skills overall - even after simplifying them a bit due to time & sometimes current skill restraints.
General asset workflow

SCULPT

RETOPOLOGISE

TEXTURE
What didn't work well + Examples:
1- Forced to rush my assets to work on the level: Week 3 onwards I had to work on it during the evenings & weekends to keep up the initial pace whilst doing the assets. This lead to not enough time to texture and retopologise as I would have liked.

The speed we had going until the 3rd week was great, the block-outs were going well and the level building was progressing. For a considerable amount of the rest of the project though, I continued my trend of working on it in the evenings and weekends to tweak things, add to the level, and do what I could to fill it out. This is evidenced through my blogs. You'll notice in #10 - #11, "no level building took place as I took a break", only when I continued in week #12 by adding Denise's blockout idea from week #9 to the current level did things begin to happen - I again started my evening/weekend working trend. During this time I got bogged down with sculpting/baking assets and couldn't find time to work on the level, therefore I literally had no level updates to post. I finished my assets early so Andy could focus on getting some key assets right and I could build away. Level building was greatly increased in the last 1 and a half weeks as all the assets were done so focus was on the level.
2- Time Management & Initial planning.
The first point was partly due to the initial planning, which wasn't too bad, but there was much to improve upon. We made a couple of timetables based on our original ideas at the time (Weeks #1 & #2) and did our best to estimate everything properly, but as the level & ideas changed, they no longer were that accurate - it became more of a milestone guide as to when specific areas of the level needed to be finished by, no matter what they include. Looking back, this was inevitable as we didn't have any idea for the project before-hand anyway, so we just went with the flow. I kept on top of things through daily & weekly to-do lists & priorities.

3- Achieving a minimum viable product (MVP) early on.
The MVP is something which you can play all the way through 100% with the bare minimum involved. We wanted to achieve this early on but left our minds until much later around week #13 where I called a team meeting due to Dom raising the concern. From this point on, I tried my best to give Dom everything he needed to script the rest of the level and just hoped that Andy would get his assets done on time. Even at this stage, the poor planning meant the level's narrative changed again, simply adding to the worry of not finishing on time.
Technical problems encountered + Solutions:
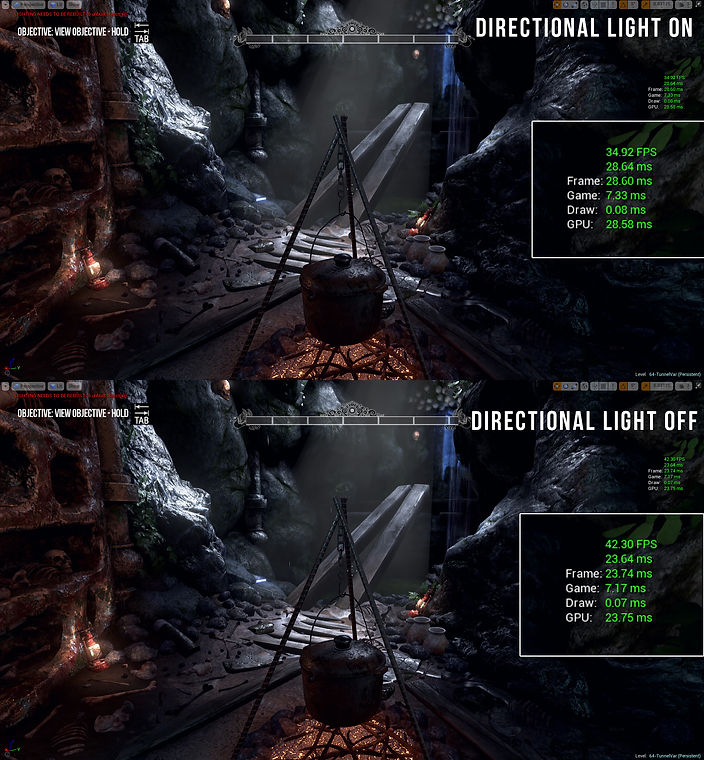
1- Significantly low fps (20-28fps)
Solution: I started the optimisation process off by downsizing all of the textures that were too high (stream pool too high, image below), then refined it some more by seeing how low I could go with them without noticeably compromising on the quality. I made LODs, changed the lightmaps for everything (this helped a great deal), and made sure that foliage painted meshes were culling. This gave us some more improvements. I then dealt with GPU particle bounding boxes, static lights, light attenuation radii, dynamic shadow casting, and static shadow casting elements which didn't need them.
The final durastic improvement to the fps came when I asked why we were getting a low fps in the cave, to which Dom found out the directional light was causing a massive issue. He proceeded to turn it off whilst in the cave, along with the fog and skylight as it needed to be dark anyway - this gained us a good 15-20fps in the cave in labs (Varies between computers-screenshot from home PC).
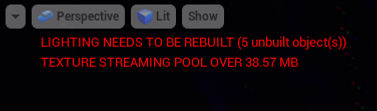
It was over by much more!
2- Technical & Artistic problem - We couldn't make a tree fast, and to an acceptable standard.
We originally planned to use Dom's tree tool to create our trees with full branches & roots. However, this wasn't fully complete until a good deal into the project and we assumed it would be good enough as we tested the basics at the start of the project (See blog #1 for more info). However, it could not produce what we were after - A problem suggested which could arise as mentioned in our brief document.
Solution: Therefore, we decided to sort the issue out by learning how to use speedtree and its custom mesh abilities. Andy, Dom and I all sat down and went through it together with Andy on the controls. We managed to get a somewhat good result from only a couple of hours and a huge weight was lifted (week #14).
We therefore used the tool for vines only.


3- LOD problems + with foliage.
This was a big problem but had a very minor fix. You can see it in more depth in blog #17, but it basically meant that any mesh that had a LOD, was producing very unsightly results that you'd expect from overlapping UVs.
Solution: I simply found the answer in an online thread. The reason was that I couldn't change the lightmap coordinate index due to the fact that my LODs weren't having any lightmaps generated for them, hence the errors. I found the fix for it online and as usual was a simple checkbox I missed (11,500 lighting errors down to less than 500). It took me nearly 2 weeks to figure it out and is the only other notable technical issue we had.


Secondly, this bug is a major pain because you may need to import your LOD multiple times due to the 90 degree roation bug (yes, another bug!). For every successive import, the material ID's will increase by the amount on the original mesh.
Feedback & Actions Taken:
1- Tutor, Emma, Week 2 = Benchmark an area which includes a range of assets to gauge time-frame and quality.
We were still blocking out at this stage and planned to continue for another week. In retrospect, if we hadn't started making assets when Emma mentioned this to us, it could have proved even more stressful towards the end and potentially damaging to the final outcome as things would have been delayed even more than what they already were. It served as a mini 'kick' to get fully started with the project and move past the 'initial' phase. (Week #2)


2- Tutor, Casto = Gave advice throughout on things to improve + ideas.
For the courtyard, he suggested points about our lighting being too saturated, fire placement being too distracting, not making it obvious where we want the person to look for example. We changed all of these things which helped contribute to the result we ended up with. Casto also suggested a chasm idea for inside of the temple which we were on-board for at the time, but as we ended up having no unique 'Artefact' to collect, this was not implemented and had to quickly come up with what we currenly have... A cave. A late addition Casto mentioned was making the eyes open upon approach. I quickly made another eyelid and Dom made it work.


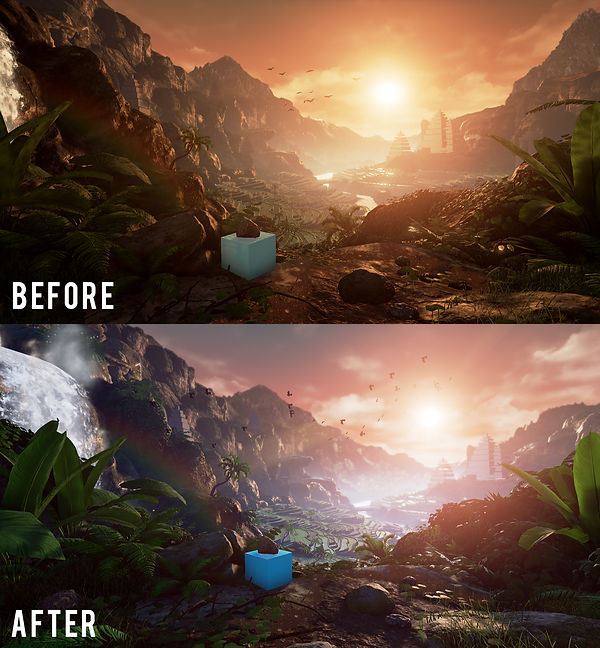
3- Industry guest, Ben Keeling, Week 14 = Advised us on quite a few things when he came into the labs.
The most notable ones were to: A) Get some trees in there. B) Fix some of the textures at the start C) Get some more colour in the coutyard to draw your attention more towards where you want the attention to be. We of course acted upon this and corrected all of these points. This is the quick paintover Denise did to address the colour point (I then followed and added to my texture + lighting situation), Andy made the branches for the canope in speedtree, and we both fixed the textures he pointed out in the start area.

BEFORE
DENISE'S PAINTOVER
AFTER

4- Tutor, Craig = Gave us advice/ideas throughout the project.
One example was for the cave tunnel. To add more interest, create a alternate route you cannot follow which just adds a bit more to the journey/story (Week 15). Initially, I had a very plain wall which was later repeated. I changed this into an opportunity for another compositional shot.
Craig (and Mike Kelly) also advised us on scale, proportions and layout which were a bit muddled at the beginning of the project. The feedback they gave were extremely helpful in getting a better understanding for these things and how to improve what we had at the time. We acted on their advise by shfting and scaling many things around when trying to establish a better layout for the courtyard.
Some block-out ideas:

What I would do differently/How I would apply it to future projects:
If I were to approach this project again I would:
1- Put even more emphasis on purpose/narrative. The project itself 'Bali Temple', based on culture and mythology sounds interesting, however, if we want to make something playable and engaging, there needs to be more than just "this looks cool". For example, who is the main character?, why are they there?, what's happened to this place & why? I know this can be a hard thing to get across, but I feel we definitely could have achieved this if we dedicated just a bit more thought into the narrative and consistently reminded ourselves of it throughout the process.
I'd apply this to future projects simply by being mindful and establishing more of a narrative and purpose to the design. If this happens, it is more likely that anyone seeing the environment for the first time will understand what is going on, and want to find out more.
2- Finalise the initial planning stage/Better planning in general. As mentioned, Emma suggested benchmarking an area first, which for us, turned into basically starting the project. I believe this shifted our focus from getting the initial block-outs finalised early on, to just making stuff in general. As useful as it was, if we continued to solidify our ideas for the level rather than just having a general clue, we could have ended up with a more thought-out result. In terms of general planning, we did make a couple of timetables, but they quickly became redundant as the project was still devloping and therefore changed durastically.
I'd apply this to future projects by establishing a clearer vision for the basics at least before continuing and going blind for the majority of the project. The second half of our level is mostly a result of this bad planning, failing to establish a clearer vision before progressing.
3- Try to get source control/Perforce at the start. I didn't know about it at the time, but if it is possible to set up in any future projects then I would highly reccommend it. Source control was such a big help in dealing with engine pass-overs to the team as well as backing up everything for you when you submit your changes. It keeps track of all the files you modified and you can revert back if you don't like what was changed.
I'd apply it to future projects depending on the situation, but I know roughly how to set it up as Dom gave me a rundown of the process. If the decision wasn't in my control then I would at least recommend it to anyone who has to deal with management or a lot of passing the main file around as it saves time and resources.
Did I meet my 'Action points' I set before the FMP?:
1- "Regularly analyse and critically evaluate at significant stages." Yes. I did this at many stages during the FMP. This point will continue to benefit me in the future, as it has changed my mindset when approaching a section that I am not too happy with; questioning what doesn't work, and understanding what could be changed in order to improve the result (Xomposition week #6, Post process big change week #9).
Example, the vista shot:

WEEK #6
WEEK #9
2- "Sequential composition." Yes. This was on my mind every time a decision had to be made about the player path, or the layout of the level. I was always consciously trying to look for ways in which we can made the journey of the player have consistent shots with good composition. The idea was there from the very start, and consistently I asked my peers/tutors for adivice to get another perspective on the shots I was trying so hard to get.
3- "Consistency of research." Yes. As a team, we absolutely met this. At the very start, we looked into the Balinese/Hindu culture & mythologies for inspiration that could help our project. This also included the types of fauna & flora to help with the idea as you're playing the level. Further & continued research continued as and when required to make decisions which could suggest culture E.g. Patterns, Rice paddies,Shack, Stamps, Particular assets (Coffin hatches on trees), Temple construction/layout etc.


Additional Note-worthy Points:
1- You will see in our development blogs that Denise had very nice designs for the courtyard area/front of the temple, and we just had to simplify it into more manageable, properly constructed elements, otherwise it could have been a big mess due to slow progression of the level.
2- We scaled down a lot from our original ideas, but in hindsight, we should have just gone for a very small little inner part of the temple and the front courtyard with vista, nothing else. Both outcomes would have been acceptable, but I feel if we scaled down just a tiny bit more, the overall product would have been much more refined.
3- Perforce keeps a revision history of all submissions. I had 110 updates as of 19/05/2016, covering multiple tweaks at a time & everything from level building/set-dressing, lighting, tweaking, importing, polishing etc. This roughly equates to updates twice per day, every day, for 2 months. My work-rate remained near constant throughout the project. If we had Perforce from the start, you'd be able to view the entire process from beginning to end and exactly how many updates were submitted. This is only work done in UE4, I was also making assets through this time.
4- A lot of time and care was taken in building the actual level, including the asset placements, lighting, creating material shaders, post-process, blocking ideas out etc. Andy and I both put forward a lot of great ideas for the level designs and is another factor which may not be as well documented as we would like as it shows some of our iteration process.
5- Most things which Dom made for us, Andy and I also sat down with him to refine exactly what "X" needed to be, for example, amount of boat rocking, boat speed, climbing speeds, tool requirements for the mesh creation, amount/range of light emitting from the dynamic lights, placement of the torch, objectives + objective markers for the player etc. In short, Dom made all the complicated blueprints etc, work, we sat and tweaked them together as a team or on my own if I could understand what to change in the blueprint.
Project Conclusion/Did we meet our brief?:
Brief: The project is orientated towards our individual career goals. As a group, we are required to concept, model and texture and in-game Balinese/Indonesian Temple environment based on photo reference and conceptual reference to make it a bit fantasised but realistic style. The level design and concepts need to reflect what Uncharted 2 and Tomb Raider does well; put emphasis on sequential composition and show good appreciation for scale, detail density, colour, and silhouettes. Meshes must have good topology and efficiently use the UV space. Technical aspects involves complex shaders, blueprints, tools and extras.
Overall, I feel as though we fully met the brief we set ourselves. The end result is fairly good and technically bug-free; I only have a few regrets but that seems to happen with most projects. I have learnt so much throughout the course of this project, not just from doing my own work, but from seeing how all of our minds worked and how we all approached things from different angles. There is of course room for a lot of be improved upon in terms of detail density and scale in the latter part of the level (Inner cave) due to it being a bit rushed for example. However, I would say we've done a good job to get it to where it at now, and I am proud to have the final outcome that we have. Well done team!
---------------------------------------------------------------------------------------------------------------------
How to complete the level (Tutors)
General Info that may help:
- Typical W, S, A, D to walk, the other controls will be explained to you as you play through.
- The top bar is the compass which tells you where your objectives are (just like Skyrim).
- Press and hold 'Q' to view your current objective
- Press 'I' to open and close your inventory
We tested it multiple times and some people had trouble with choosing which items to craft (Select all 3).
To craft:
Pick up all 3 items as indicated on-screen, then:
- Select an item by clicking on the middle icon or "Select Item" button. Move to the next one by clicking the arrow or left or right icon.
- Select all 3 items; they'll have changed from yellow to cyan coloured if selected.
- Click "craft" to get your un-lit torch.
Everything else is self-explanitory.
Side-Notes:
- On the odd occasion, the game won't fade out at the end at the point as it should. Please play in the editor if this happens or just try again.
- Dom scripted icon prompt buttons & controls to change on the fly to the Xbox ones if you wish to use an Xbox controller.
- Please feel free to turn the sound on or use your headphones as it adds to the atmosphere, especially inside the cave.
Here's a walk-through taken during week #19 should you get stuck:
The crafting is shown at 0:57.
---------------------------------------------------------------------------------------------------------------------
Detailed Lighting:


---------------------------------------------------------------------------------------------------------------------
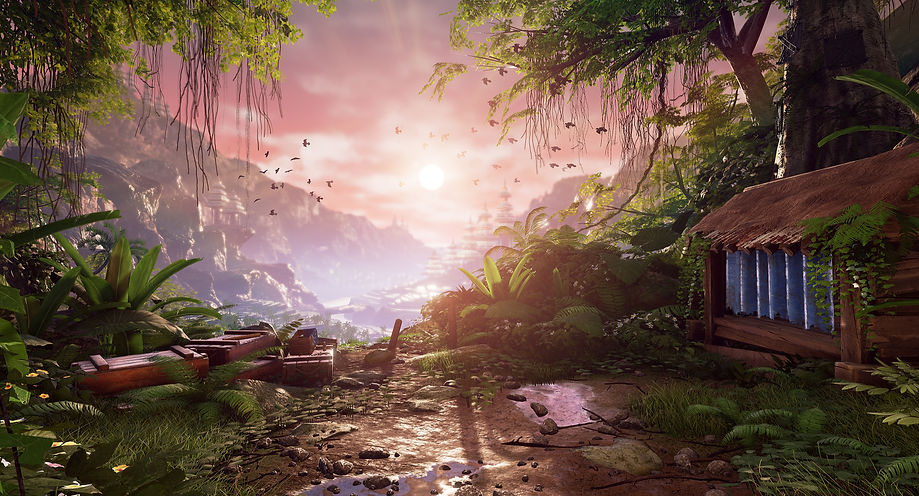
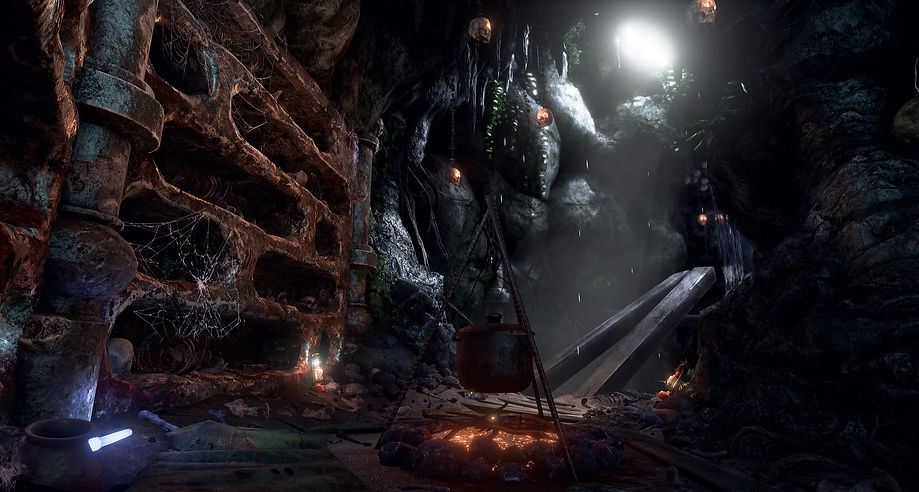
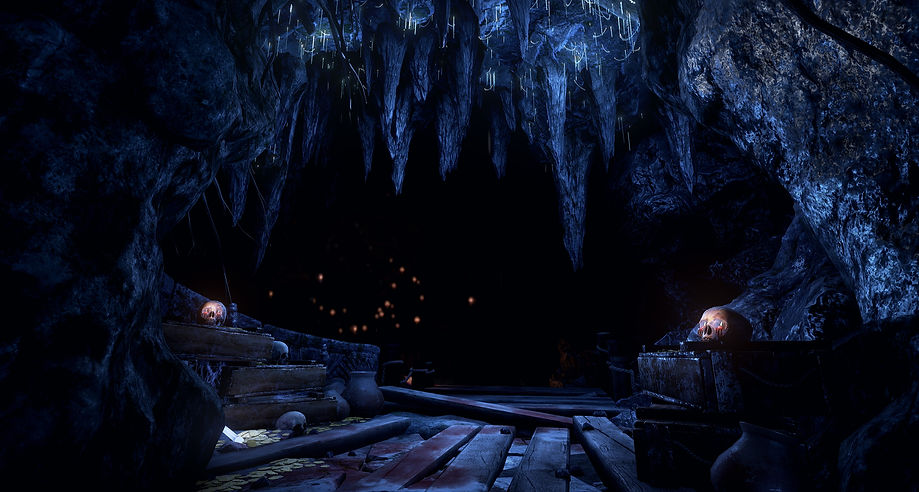
Level Beauty Shots: